
Building a Website. Why WordPress Still Beats AI Website Builders, Especially for Beginners
Building a website used to mean hiring a developer or learning to code. Today, AI tools can create a whole site from a short description, and they can do it in minutes. For a beginner, that sounds like the perfect shortcut.
There is a catch, though. Most AI website tools decide the design, the layout and even the wording for you. You can usually make small changes, but you don’t get full control. As a result, many of these sites look generic, and moving them somewhere else can be difficult.
That is why this guide shows you how to build a WordPress website instead. WordPress is free, and you own everything you create. You can still use AI along the way to save time, but you stay in charge.
Before you start, you should already have your domain name and web hosting. If you haven’t, go back and read those two articles first, Choosing Your Domain Name, and Hosting Your Website, then return here.
Key Takeaways
- AI website builders are fast, but they trade ownership and control for speed.
- WordPress gives you a website you own, can change freely, and can grow over time.
- With your domain and hosting in place, a first site needs only WordPress, a theme, a few pages and a handful of plugins.
- AI works best as an assistant inside WordPress, not as a replacement for it.
- Launching is the start, not the finish, because regular updates and backups keep a site healthy.
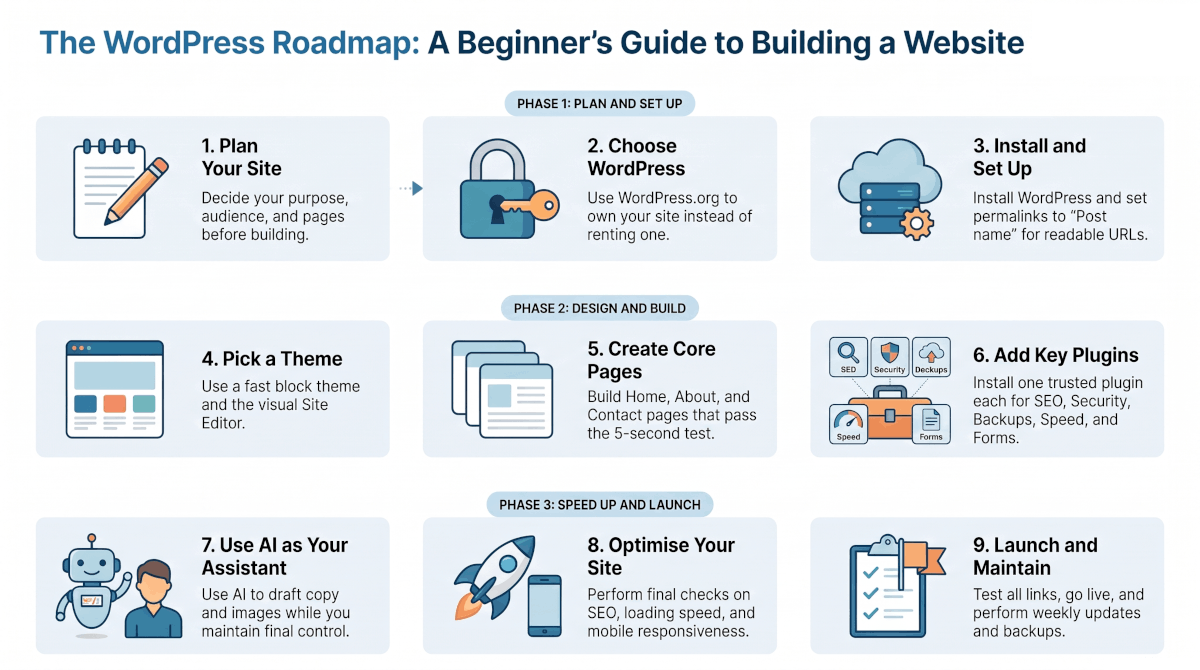
Your nine-step roadmap to building a website you own with WordPress, from planning to launch.
Step 1: Plan Before You Start Building a Website
A little planning saves hours of rework later. Spend twenty minutes on these three questions before you touch WordPress.
Define what your website is for
Start with one clear purpose. A website might sell a product, promote a service, share a blog, or show off your work. Each purpose needs different pages and features, so pick the main one first. You can always add more later. For example, a coach needs a booking page, while a blogger needs a strong homepage and clear categories.
Know who it’s for
Next, picture your ideal visitor. What are they searching for, and what do they need to find within a few seconds of landing on your site? Write that down in a single sentence. Then use it to guide every choice, from the wording on your homepage to the links in your menu.
Sketch the pages you need to build your website
Finally, list the pages you need. Most beginner sites need five to seven pages, so keep it small. A pen and paper sketch is enough. Draw a box for each page and connect them the way your menu will connect them. This simple map becomes your to-do list for Step 5.
Step 2: Why Build a WordPress Website Instead of an AI-Generated One
AI builders are not bad tools. However, for a beginner who wants a site that lasts, WordPress offers several clear advantages.
You own your website
WordPress is free, open source software, and your files sit on your own hosting account. No company can change its pricing, remove a feature or lock you out of your content. If you ever want to change hosts, you can move the whole site. Many AI builders make that move difficult, because your site only works inside their platform.
You get real control over design and features
WordPress lets you change almost anything. You can adjust every colour, font and layout, and you can add features such as booking systems, online shops or membership areas. An AI builder usually limits you to whatever its editor allows. So when you want something specific, you either hit a wall or pay for a higher plan.
Plug-ins let a WordPress website grow with you
Thousands of plug-ins add new features without any coding. You can start with a simple blog today, then add a shop, a newsletter or a course platform later. Meanwhile, the same site keeps working. With many AI-generated sites, growth means rebuilding on a different platform.
AI-generated sites can be generic and hard to fix
AI tools tend to produce similar layouts and safe, bland copy. That makes it harder for your site to stand out. Moreover, tools that generate code can leave you with a site you cannot edit when something breaks. WordPress has a huge community and plenty of tutorials, so answers to almost any problem are one search away.
When an AI builder is still a fair choice
To be fair, an AI builder makes sense in some situations. If you need a simple one-page site this afternoon, or a short-term site for an event, the speed may be worth the trade-off. But if you plan to grow your site over time, owning it matters. The good news is that you don’t have to choose between AI and WordPress, as Step 7 shows.
Step 3: Install WordPress
Now for the fun part. With your hosting ready, installing WordPress takes only a few minutes.
Make sure you use WordPress.org
Two different services share the WordPress name. WordPress.org is the free software you install on your own hosting, and it is what this guide uses. WordPress.com is a separate commercial service that hosts sites for you, with limits on the cheaper plans. Since you already have hosting, you want WordPress.org.
Use your host’s one-click installer
Nearly every host offers a one-click WordPress installer in its control panel. Log in, find the WordPress option, and choose your domain. Then pick a site title, an admin username and a strong password, and save those details in a password manager. When the installer finishes, it gives you a login link, which is usually your domain followed by /wp-admin.
Change these settings first
Before you do anything else, tidy up a few basics. You do all of this inside your WordPress dashboard, not in your hosting control panel. To open it, type your domain followed by /wp-admin into your browser, then log in with the username and password you chose during installation. The menu down the left-hand side of the dashboard is where you will find everything below.
Set your permalinks. Permalinks are the web addresses of your pages and posts. In the left-hand menu, hover over Settings and click Permalinks. Under Common Settings, select Post name, then scroll to the bottom and click Save Changes. As a result, your addresses will be short and readable, such as yourwebsite.com/about, instead of a string of numbers.
Check your site title and tagline. Next, click Settings in the left-hand menu, then General. Type your website’s name in the Site Title box, and add a short description of what your site is about in the Tagline box. Then scroll down and click Save Changes.
Delete the sample content. WordPress adds a sample post and a sample page to every new site. Click Posts in the left-hand menu, hover over “Hello world!”, and click Trash. Then click Pages, hover over “Sample Page”, and click Trash. Leave the draft Privacy Policy page alone, because you will use it in Step 5. Finally, click Plug-ins, and if you see one called Hello Dolly, click Deactivate, then Delete.
Step 4: Choose a Theme and Design Your Site
A theme controls how your website looks. Because you can switch themes later, don’t spend days on this choice.
Block themes and the Site Editor
Modern WordPress themes are block themes. They work with the Site Editor, which you find under Appearance, then Editor. Here you can edit your header, footer, colours and page layouts visually, much like arranging building blocks. As a result, you don’t need code or extra design tools to get a professional look.
Free vs premium themes
Free themes from the WordPress theme directory are safe, reliable and good enough for most beginners. Premium themes add extra layouts and support, which helps if you want a polished look quickly. Either way, choose a theme that is fast, mobile friendly and regularly updated. Avoid heavy themes packed with features you’ll never use, because they slow your site down.
Step 5: Create Your Core Pages and Menu
With the design in place, it’s time to add content. Use the page map you sketched in Step 1.
Pages every website you build needs
Most sites need the same basic pages. Create these first:
- Home: tells visitors what your site is about within five seconds
- About: builds trust by showing who is behind the site
- Contact: gives visitors an easy way to reach you
- Blog or services: a blog brings in new visitors, and a services page shows what you offer
- Privacy Policy: all websites require one and is one of the Legal pages.
Your homepage matters most, so give it the five-second test. Visitors should understand what your website is about within five seconds of landing on it. The top section of the page, called the hero section, does most of this work. It usually holds a headline, a short line underneath and a button. Read yours as if you were a stranger. If you can’t tell what the site offers and who it’s for in five seconds, rewrite it until you can.
Depending on the kind of website you run, you may also need a few extra pages:
- Affiliate Disclosure: tells visitors you may earn a commission when they buy through your links
- Terms of Service: sets the rules for using your site, especially if you sell products or accept comments
- Disclaimer: explains that your content is for information only, which matters for topics such as health, money or legal advice
Rules differ from country to country, so check what applies where you live. Then write clear, simple text for each page and publish them.
To be honest this is where AI can help, Claude or ChatGPT can write all your legal pages. Just give then your website URL and a brief explanation on what your website is about and it will write them for you.
Set up your navigation
Open the Navigation area in the Site Editor to build your menu. Keep it short, ideally five to seven links. Also, put your most important page first and add a clear button such as “Contact” or “Get started”. Visitors who can’t find what they need quickly will leave.
Setting Up Your Menu
Your menu is the row of links across the top of your site that helps visitors find their way around. To set it up, go to your WordPress dashboard and hover over Appearance in the left-hand menu. A drop-down list will appear, so click Menus. That takes you to the menu section.
If you don’t see Menus in the list, your theme is a block theme. In that case, click Appearance, then Editor, then Navigation instead.
Type a name for your menu, such as Main Menu, and click Create Menu. Then tick the pages you want, click Add to Menu, and click Save Menu. Keep it short, ideally five to seven links. Also, put your most important page first and add a clear button such as “Contact” or “Get started”. Visitors who can’t find what they need quickly will leave.
Step 6: Install Essential Plug-ins
Plug-ins add features to WordPress, but more is not better. Every plug-in adds weight and something else to keep updated, so install only what you need. For a first site, these five categories cover almost everything:
- SEO: an SEO plug-in helps you write for search engines
- Security: a security plug-in blocks common attacks
- Backups: a backup plug-in saves copies you can restore
- Speed: a caching plug-in makes your pages load faster, and many hosts include their own
- Forms: a form plug-in lets visitors contact you without seeing your email address
Only install plug-ins from the official WordPress plug-in directory or from trusted developers, and delete any you stop using. Additionally, keep them updated, because outdated plug-ins are a common entry point for attackers.
Step 7: Use AI Tools to Speed Up Building Your WordPress Website
Here is where AI earns its place. Instead of replacing WordPress, it can speed up the slowest parts of building your website.
AI for writing and images
AI chat assistants can draft page copy, suggest headlines and write meta descriptions. Ask for a first draft, then edit it in your own voice. You can also ask an assistant to write alt text for your photos. Always check the facts, because AI can sound confident while being wrong.
AI built into WordPress
Some tools bring AI directly into WordPress. Certain page builders and WordPress services can now generate text, images and layouts for you. Because you are still working in standard WordPress, you keep the flexibility that made you choose it in the first place. However, check where each tool hosts your site before you commit, because you want to stay in control of your files.
What to keep human
Use AI for speed, but keep the important decisions yourself. Your voice, your facts, your offer and your final edit should always come from you. Visitors and search engines both value original, helpful content, and generic AI text rarely delivers that on its own.
Step 8: Optimise Your Website for SEO, Speed and Mobile
A good-looking site is not enough if nobody finds it or it loads slowly. Fortunately, a few basic checks go a long way.
Basic on-page SEO
Give each page a clear title and a short meta description with your SEO plug-in. Then use one main heading per page, and write descriptive headings underneath. Add alt text to every image, and link related pages to each other. Finally, choose one main keyword for each page and use it naturally, not repeatedly.
Speed and mobile check
Most visitors will arrive on a phone, so test your site on one. Check that text is readable, buttons are easy to tap and images don’t push the page around. Next, run your homepage through Google’s free PageSpeed Insights tool. If it’s slow, compress your images first, since large images are the most common cause.
Step 9: Launch the Website You've Built and Keep It Healthy
You’re nearly there. A short checklist keeps launch day calm.
Pre-launch checklist
Work through this list before you announce anything:
- Click every link and menu item to confirm it works.
- Submit your contact form and check that the message arrives.
- Read each page once more for typos.
- Confirm your site loads with https in the address bar.
- Untick “Discourage search engines from indexing this site” under Settings, then Reading.
Once everything checks out, connect Google Search Console so Google can find your pages. Then share your site with the world.
Updates, backups and security
Launching is the start, not the finish. Log in weekly to update WordPress, your theme and your plug-ins. Also, confirm that your backup plug-in runs on schedule, and store copies away from your hosting account. Finally, use a strong password and, if you can, turn on two-factor login. Ten minutes a week keeps your site safe and fast.
Quick Recap: How to Build a Website with WordPress
- Plan your website’s purpose, audience and pages.
- Choose WordPress for ownership, control and room to grow.
- Install WordPress.org using your host’s one-click installer.
- Pick a fast, mobile-friendly block theme.
- Create your core pages and a simple menu.
- Add a few essential plug-ins.
- Use AI to speed up writing and design, but keep control.
- Optimise your site for SEO, speed and mobile.
- Launch, then keep everything updated and backed up.
Frequently Asked Questions
How do I build a website as a beginner?
Start by planning your pages, then get a domain name and hosting. Install WordPress, choose a theme, add your core pages and a few plugins, and launch. The steps above walk you through each stage.
Is WordPress good for beginners?
Yes. WordPress has a visual editor, thousands of themes and a huge community, so help is easy to find. There is a small learning curve at first, but you don’t need any code.
How much does a WordPress website cost?
The WordPress software itself is free. Your main costs are a domain name and web hosting, which you have already covered. Premium themes and plugins are optional extras.
Can AI build a WordPress website?
Partly. Some AI tools made for WordPress can generate layouts, text and images for you. However, you still need to plan the site, review the results and make the decisions. Think of AI as a fast assistant, not a replacement for you.
What is the difference between WordPress.com and WordPress.org?
WordPress.org is free, open source software you install on your own hosting, so you control everything. WordPress.com is a hosted service with plans and limits set by the company. Most people who want full control choose WordPress.org.
Do I need to know how to code to use WordPress?
No. Themes and the Site Editor let you design pages visually, and plugins add features without code. Coding knowledge helps later if you want deeper customisation, but you can start without it.
How long does it take to set up a WordPress site?
A simple site can be live in a weekend. Most of the time goes into writing your page content, not into the technical setup. Give yourself a few days if you’re writing everything yourself.
Is WordPress better than an AI website builder?
It depends on your goals. AI builders are quicker for very simple sites. WordPress is better if you want ownership, flexibility and room to grow, which is why this guide uses it.
